Fiora Build Guide
Preface
To fulfill one of my early computer science dreams — a chat room — I'm building Fiora once again. I've built Fiora multiple times before, but only succeeded once, and that was using Docker with a pre-built image, so it doesn't really count as a true build. This guide is about building from source code.
Fiora
Fiora is a chat room system developed by 碎碎酱 (Suisui Jiang). Due to various reasons, Fiora is no longer updated and rarely maintained, so in 2023, getting Fiora running again is quite challenging. Moreover, the Fiora docs aren't detailed enough, making it easy for newcomers to hit pitfalls. Despite the lack of maintenance and build difficulties, Fiora itself is an excellent chat room system.
Pitfall Avoidance Guide
If you already have a rough understanding of Fiora's build mechanism but are stuck on some issues, here are some pointers.
- Node.js version: Use v14 LTS.
If you encounter an issue like the one in the image when running
yarn build:web(building the client),
- Node.js version: Use v14 LTS.
If you encounter an issue like the one in the image when running
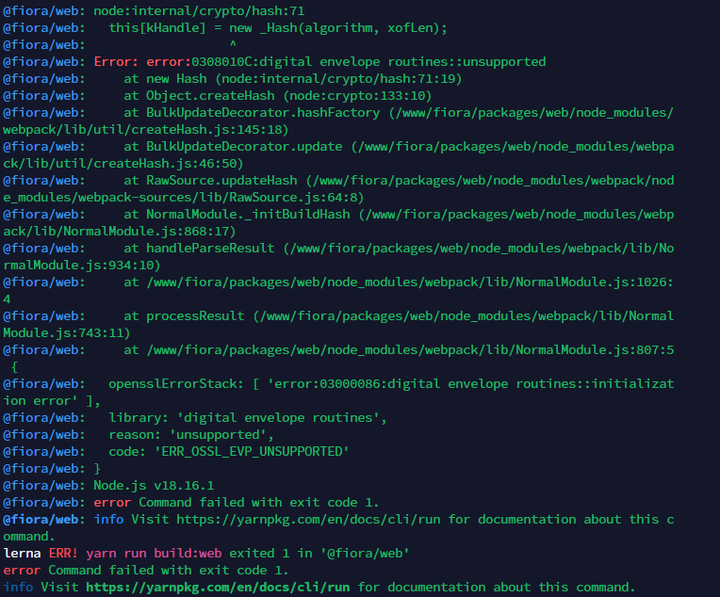
it's likely because your Node.js version is too high. After all, this is a project from 2015, and using a high Node.js version nowadays is not polite. In the image, the 6th line from the bottom shows the Node.js version you're using. If you can't find it, you can run the command
# Check Node.js version
node -v
# or
node --version
to check your Node.js version.

Usually it's the latest version, but you should use Node.js v14. After switching, run the above command again to verify it took effect. If it didn't, try restarting the server. After switching, you'll need to reinstall yarn, reinstall dependencies, and rebuild the client.
- If building the client takes too long, upgrade your server; 2 cores and 2GB RAM is recommended.
- To get the UserID, you cannot use Fiora's built-in commands; check the console instead.
- Building the Fiora companion App requires a new build method, not the one described in Fiora docs. Note that due to a recent code refactor, the App may no longer be able to communicate with the server.
Getting Started
Server Configuration Guide
Although Fiora doesn't have high configuration requirements, it's not without a threshold, because building from source requires some resources.
- Minimum configuration: 1 core, 2GB RAM or higher (2 cores, 2GB recommended)
- Network: Must have outbound internet access
- Disk space: 2GB or more
- Environment: Node.js (v14), MongoDB, Redis
- Server OS: Ubuntu 22 (this guide uses this OS)
I won't cover how to install Node.js, MongoDB, and Redis. If you want to save effort, you can install our old friend BT.CN and choose to install the PM2 Manager, so you won't need to install pm2 or npm separately.
Build Guide
Web Build
First, clone the project to your local machine. Before that, make sure your server has git installed (usually it does). Run the following command:
# Clone the project
 git clone https://github.com/yinxin630/fiora.git -b master
Note: If your server is in mainland China, the clone might fail. You can download it from GitHub and upload it to your server. After cloning, you need to enter the Fiora directory:
cd /fiora
When running this command, make sure to include your actual directory. For example, if I cloned Fiora into /www/project, I should run:
cd /www/project/fiora
Next, make sure your Node.js version is v14. Run the following command to check:
# Check Node.js version
node -v
# or
node --version
This is crucial for the yarn installation and subsequent build success. If it's not v14, switch to v14.

After that, we need to check if yarn is installed. Usually it's not. If you think you have it, you can confirm with:
yarn -v
If you're sure you don't have yarn, install it with:
npm install -g yarn
After a short wait, yarn will be installed. There's usually no specific requirement for yarn, but if you suspect issues, try switching to version 1.22.19, which has been tested and works fine.
23/12/23 Update: Resolved a series of issues and added support for Fiora's built-in command-line tool.
Install project dependencies:
yarn install
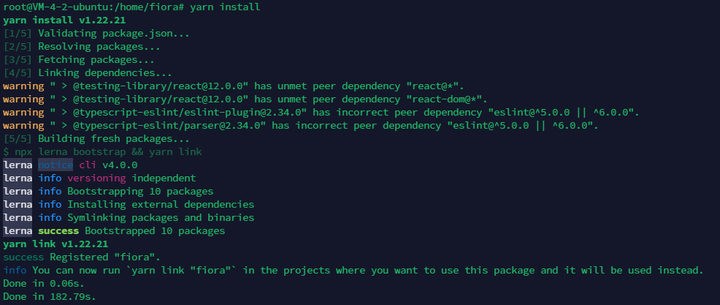
Then link the Fiora project:
yarn link "fiora"
Now it's time to actually build Fiora. Building Fiora is actually simple: once you've completed the above steps, just run:
yarn build:web
After waiting a bit, the build is complete.
Next, configure JwtSecret. Although I don't know why it's needed, without it, Fiora won't run. Run the following command:
echo "JwtSecret=<string>" > .env2
Replace <string> with a secret text.
Finally, start Fiora:
yarn start
Once started, open http://[IP address]:[port] (e.g., http://127.0.0.1:9200) in your browser to access the site. The default port is 9200.
Adding an Administrator
This section uses Fiora's built-in script. If it doesn't work, check that you've linked the Fiora project.
yarn link "fiora"
Usually, if you followed the build steps above, you can add an administrator without further checks.
For more Fiora built-in scripts, see → Scripts | Fiora Docs
After successfully starting Fiora, you'll see the Fiora runtime logs. Go to the successfully started address, register a user, and remember the username. PressCTRL andC simultaneously to exit the logs.
fiora getUserId [username]
Replace [username] with the username you registered. This will give you the user's UserID.

658637b993f5dbef4c3e1f0a is the UserID we need. Add this ID to line 34 of /packages/config/server.ts:
administrator: env.Administrator ? env.Administrator.split(',') : ["658637b993f5dbef4c3e1f0a"],
After configuration, restart Fiora.
Unresolved Issues
App Build
After extensive research, I found that the build method described in Fiora App | fiora docs is completely impossible to succeed in 2023 — it will definitely throw tons of errors! And even after successfully building the App, due to the recent code refactor, the App can no longer communicate with its own server in 2023!!!!!!! Even 碎碎酱's own App doesn't work. I'm writing this App build guide in the hope that a kind expert might help solve this problem!
After completing the Web build, there will be an app directory inside /fiora/packages. Enter it; this is the directory we'll work with for the App build.
cd /fiora/packages/app
Run the following command to install the latest EAS CLI:
npm install -g eas-cli
Then register an account on Expo and remember the credentials, because we'll be doing a cloud build, not a local one. Next, log in:
eas login
Enter the account and password you just registered to complete verification. Then run the following command and choose the packaging type using↑,↓, andENTER. I'll only select Android here.
eas build:configure
Next, run the following command for the first build:
eas build --platform android
After about 10 minutes, you'll see the following on the Expo homepage after logging in:
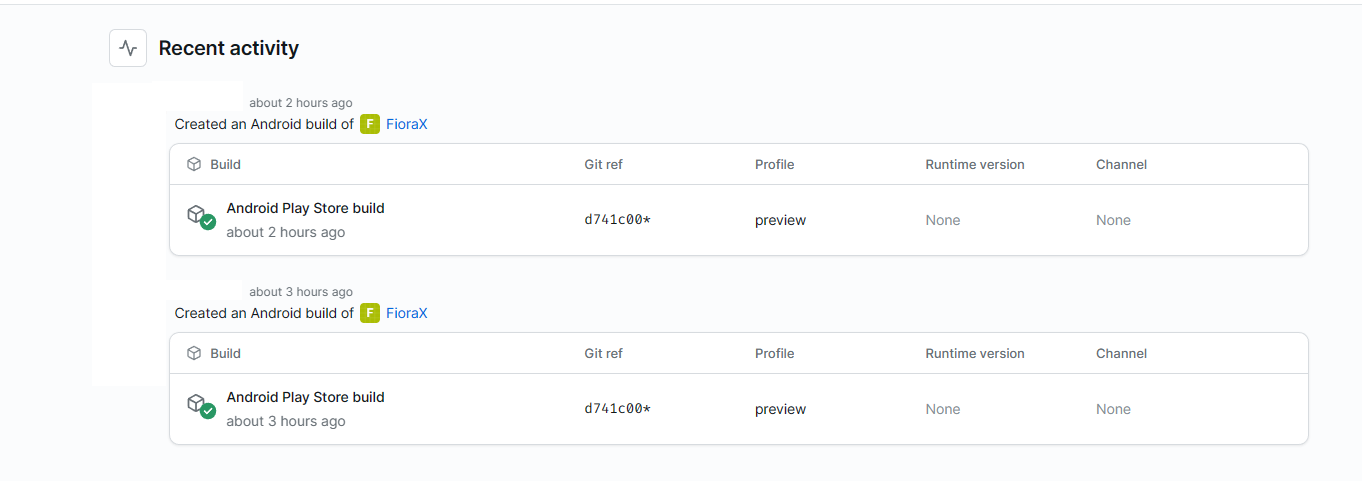
Click in to download your .aab package. Yes, it's .aab, not .apk, so we need a second build. Before the second build, go to /fiora/packages/app and edit the eas.json file, replacing its content with:
{
  "build": {
    "preview": {
      "android": {
        "buildType": "apk"
      }
    },
    "preview2": {
      "android": {
        "gradleCommand": ":app:assembleRelease"
      }
    },
    "preview3": {
      "developmentClient": true
    },
    "production": {}
  }
}
Then we build again, but this time with a different command:
eas build -p android --profile preview
After another 10 minutes, the App build is complete, and you can download the .apk package. It even auto-signs it for you.
But as I said, this App cannot communicate with the server — we need an expert's help!
Port Issues
Some providers have strict firewall policies, so you must open the required ports. Fiora needs the following ports (not exhaustive):
- 19002: needed for App build
- 6379: needed for App build
- 9200: Fiora Web port, customizable
- 27017: database port
Other Issues
- Configuration file: Configuration | Fiora Docs
- Custom domain: Reverse Proxy | Fiora Docs
Modifications
If you plan to modify Fiora, be sure to read this section. As always, due to the recent code refactor, Fiora | Docs is no longer fully applicable in 2023, and the directory structure it provides is no longer accurate. So if you want to modify Fiora's source code, be sure to check the directory structure I've outlined below.
# Fiora partial directory structure
|-- [.githubb]                // github actions
|-- [.vscode]                 // vscode workspace configuration
|-- [packages]                // directory for all source code
|------  [app]                // App source code
|----------  [src]            // App source code
|--------------  [pages]      // App frontend UI
|----------  [app.json]       // basic App packaging info
|----------  [src]            // App source code
|------  [assets]             // static assets
|------  [config]             // Fiora configuration folder
|----------  [client.ts]      // client configuration
|----------  [server.ts]      // server configuration
|------  [database]           // database methods, usually don't touch
|------  [server]             // Web build output
|------  [utils]              // utils
|------  [web]                // Web source code
|----------  [src]            // Web source code
|--------------  [modules]    // Web frontend UI
|-- .eslintignore             // eslint ignore
|-- .eslintrc                 // eslint configuration
|-- .gitignore                // git ignore
|-- Dockerfile                // docker file
|-- LICENSE                   // fiora license
|-- docker-compose.yaml       // docker compose configuration
|-- package.json              // npm
|-- tsconfig.json             // typescript configuration
|-- yarn.lock                 // yarn
...
Conclusion
These are all the experiences I had while building Fiora this time. I hope this helps future builders avoid some pitfalls or teaches newcomers how to build the Fiora chat room. This article may still have some gaps; please bear with me. If you find any issues, please point them out, and I'll improve. Also, if any expert has a solution to the App-server communication problem, please send it to my email: magneto@88.com. Thank you!
References
Fiora Docs: https://yinxin630.github.io/fiora/zh-Hans/
Create your first build: https://docs.expo.dev/build/setup/
Expo CLI: https://docs.expo.dev/more/expo-cli/#installation
Build APKs for Android Emulators and devices: https://docs.expo.dev/build-reference/apk/